Deluxe Nacho Toppings Bar
Highlighted under: Deluxe Baking Inspirations
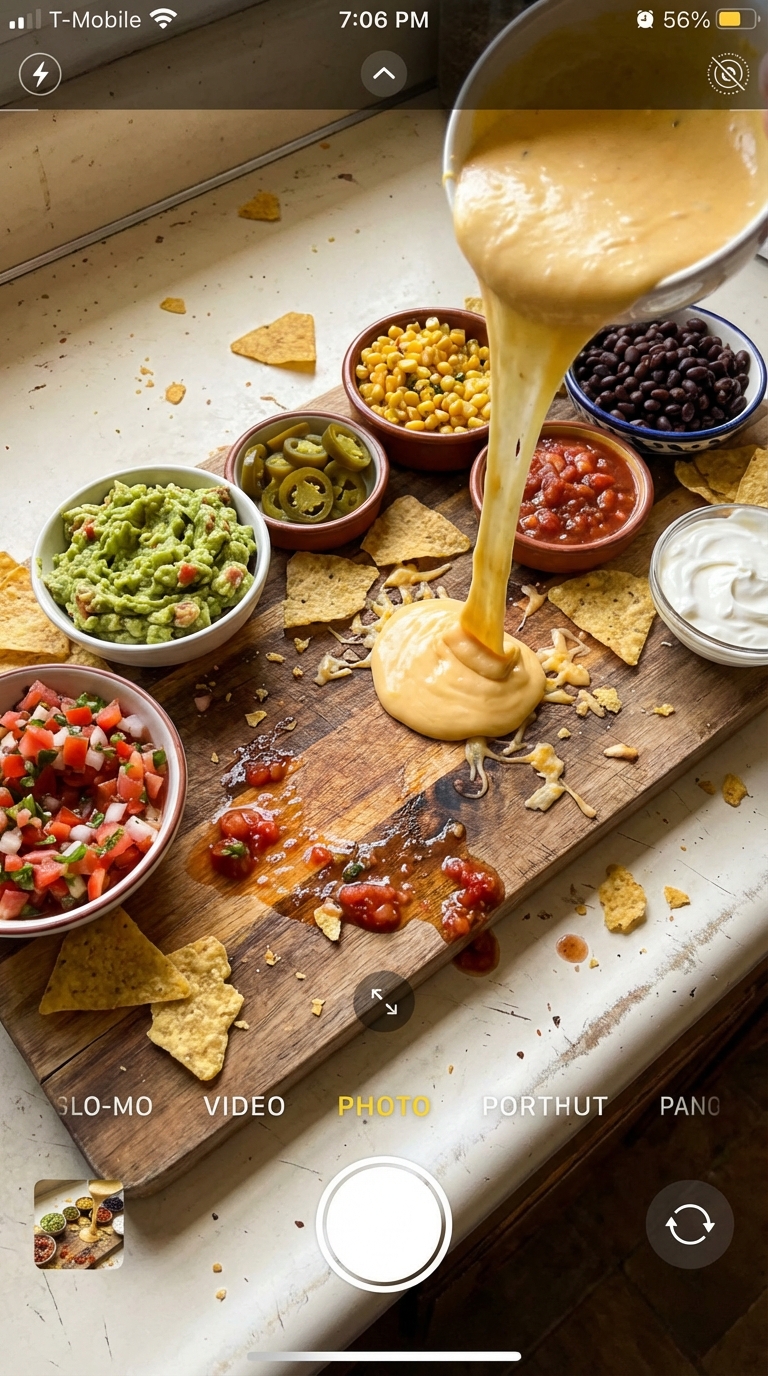
I love hosting game nights, and nothing brings friends together like a Deluxe Nacho Toppings Bar. It’s an interactive way to cater to everyone’s unique tastes, and the best part is that I can prepare everything in advance. By setting up a vibrant array of toppings, each guest has the chance to build their personal nacho masterpiece. Plus, it’s a fun way to encourage creativity around the table.
When I first created my Deluxe Nacho Toppings Bar, I wanted it to be a feast for both the eyes and the taste buds. I tried various toppings, from creamy guacamole to zesty jalapeños, ensuring there was something for everyone. The method works beautifully; by laying out all the toppings, guests get to customize their nachos just the way they like them.
One tip I learned along the way is to serve the toppings in separate bowls to keep everything fresh and appealing. This way, the flavors don’t mix prematurely, and everyone gets to choose their favorites. It's a simple trick that elevates the entire experience!
Why You Will Love This Recipe
- A fun and interactive dining experience
- A variety of colorful toppings that excite the senses
- Easily customizable to cater to every dietary preference
Building Your Nacho Foundation
The base of your Deluxe Nacho Toppings Bar is essential for holding all the delicious toppings. I recommend using sturdy tortilla chips that can withstand the weight of the toppings without breaking easily. Look for brands that are thicker or even oven-baked, as they tend to have a great crunch and golden color. If you prefer, you can even make your own by cutting corn tortillas into wedges, frying them in vegetable oil until they’re crispy, and seasoning with a bit of salt.
For added flavor, consider toasting the tortilla chips briefly in the oven at 350°F (175°C) for about 5-7 minutes. This not only enhances their crunchiness but can also bring out a richer corn flavor. Arrange the chips in a large bowl or on a platter, fanning them out so guests can easily reach them. Remember, the chips are just as important as the toppings, so invest a little time in selecting or preparing the right ones.
Creative Topping Combinations
One of the best things about a nacho bar is the ability to mix and match toppings. The shredded cheddar cheese is a must, as it melts beautifully when heated, creating a gooey texture that binds everything together. If you're looking for a bolder flavor profile, try blending different cheeses like pepper jack for some heat or a smoky gouda for depth. Just sprinkle the chosen cheese generously over the chips before placing them in a warm oven until melted, about 10 minutes.
Don’t underestimate the impact of fresh ingredients; bright toppings like chopped tomatoes and cilantro can add a refreshing contrast to the rich flavors. For those who enjoy a bit of spice, sliced jalapeños offer the perfect kick! I like to have a balance of creamy, crunchy, and zesty toppings available so that guests can build their nacho creations according to their taste preferences. Offering both fresh and pickled options can elevate the flavor experience even more.
Ingredients
Gather all the following ingredients for the ultimate nacho toppings experience:
Toppings
- Shredded cheddar cheese
- Sour cream
- Guacamole
- Sliced jalapeños
- Chopped tomatoes
- Sliced black olives
- Fresh cilantro
- Chopped green onions
Base
- Tortilla chips
Feel free to add or modify any toppings to suit your taste!
Instructions
Here's how to set up your Deluxe Nacho Toppings Bar:
Prepare the Base
Start by arranging the tortilla chips in a large bowl or on a platter.
Set Up Toppings
Place each topping in a separate bowl around the chips, creating a colorful display.
Customize
Let everyone customize their nachos by loading them up with their favorite toppings!
Enjoy your delicious creations with friends!
Pro Tips
- For an added crunch, consider baking the nachos with a layer of cheese before adding the toppings. This makes for a melty, warm base that everyone will love.
Make-Ahead Tips
To make your hosting experience smoother, prep as much as you can ahead of time. Chop tomatoes, slice olives, and prepare guacamole a few hours in advance to save time on party day. Store your guacamole in an airtight container and press a piece of plastic wrap directly against the surface to minimize browning. This way, all you need to do on the day of your gathering is arrange everything on the table.
Cheeses can also be shredded or cubed and refrigerated until serving. If you’re making homemade tortilla chips, do this step ahead as well, as they can stay crispy in an airtight container for several days. Just remember not to add any toppings until you’re ready to serve, particularly those that can wilt or become soggy.
Storage and Reheating
If, by chance, you have leftover toppings after your nacho bar, store them separately in airtight containers in the refrigerator. Grated cheese can easily be kept for up to a week, while sour cream and guacamole typically last for 3-5 days. When reheating leftover nachos, try placing them on a baking sheet in a preheated oven at 350°F (175°C) for about 10 minutes for a crispy refresh, rather than using the microwave, which can make chips soggy.
For a quick spiralization of your leftover toppings into a new dish, consider using them in a quesadilla or mixed salad. The vibrant flavors of your nachos can easily translate into new meals, minimizing waste and maximizing enjoyment!
Questions About Recipes
→ Can I make the toppings in advance?
Yes, you can prepare most toppings a day ahead and store them in the refrigerator.
→ Is this recipe gluten-free?
Yes, as long as you use gluten-free tortilla chips.
→ Can I make this recipe vegetarian?
Absolutely! All the suggested toppings are vegetarian-friendly.
→ What other toppings can I add?
Feel free to get creative with ingredients like grilled chicken, beans, or even different types of cheese.
Deluxe Nacho Toppings Bar
Created by: The Dishjunction Team
Recipe Type: Deluxe Baking Inspirations
Skill Level: Easy
Final Quantity: Serves 6-8
What You'll Need
Toppings
- Shredded cheddar cheese
- Sour cream
- Guacamole
- Sliced jalapeños
- Chopped tomatoes
- Sliced black olives
- Fresh cilantro
- Chopped green onions
Base
- Tortilla chips
How-To Steps
Start by arranging the tortilla chips in a large bowl or on a platter.
Place each topping in a separate bowl around the chips, creating a colorful display.
Let everyone customize their nachos by loading them up with their favorite toppings!
Extra Tips
- For an added crunch, consider baking the nachos with a layer of cheese before adding the toppings. This makes for a melty, warm base that everyone will love.
Nutritional Breakdown (Per Serving)
- Calories: 250 kcal
- Total Fat: 15g
- Saturated Fat: 8g
- Cholesterol: 30mg
- Sodium: 350mg
- Total Carbohydrates: 25g
- Dietary Fiber: 3g
- Sugars: 2g
- Protein: 5g